Revolutionize Your Bedroom with DIY Floating Nightstands
Floating nightstands elevate ordinary bedside furniture into a modern, space-efficient solution. These wall-mounted designs create visual openness, simplify cleaning, and provide versatile storage for compact or minimalist bedrooms. Suitable for styles ranging from Scandinavian simplicity to craftsman warmth, they require only basic tools and a single weekend to construct.
At a Glance
Ideal for: Homeowners pursuing small-space solutions and streamlined aesthetics
Setting: Suburban or urban bedrooms
Dimensions: 18 to 24 inches wide (46 to 61 centimeters) to suit standard bedside areas
Key Elements: Wall-mounted functionality, hidden storage, integrated lighting
Contributors: DIY woodworkers and independent designers
Photography: Multiple sources, credited per project
Before
Conventional nightstands occupy valuable floor space and accumulate dust beneath their bases. Cords often trail untidily from the rear, while cleaning demands shifting heavy pieces. Homeowners frequently note cluttered surfaces and drawers that stick over time.
One resident observed, "Our old tables felt bulky and closed in the room. We wanted something lighter that still gave us a place for a lamp and phone."
The primary issue involves balancing functionality with visual tranquility and accessibility.
After
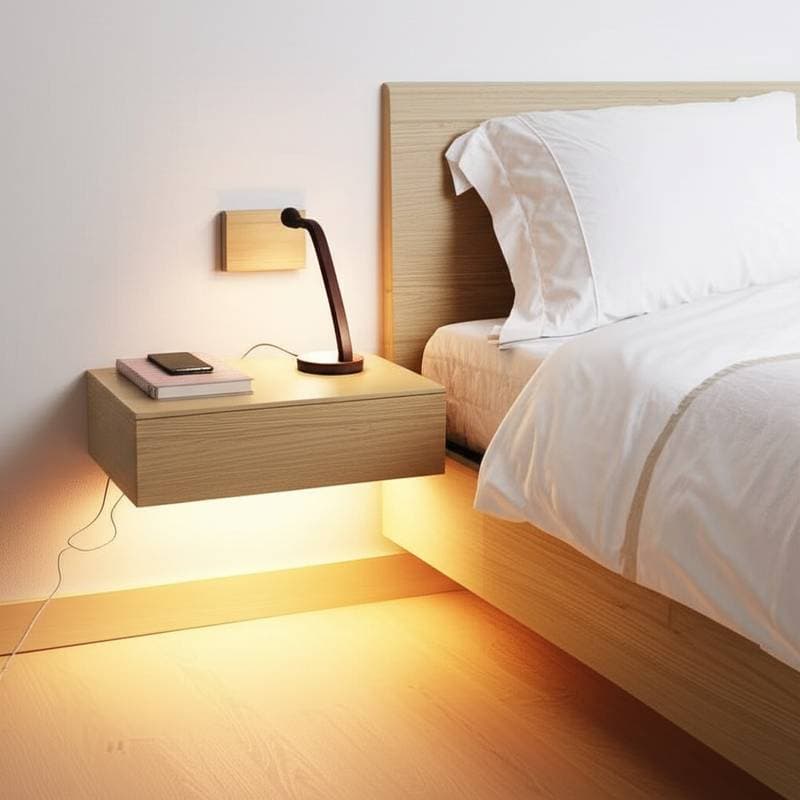
DIY floating nightstands address these concerns by securing directly to the wall, leaving the floor unobstructed to enhance the sense of scale in smaller rooms. Position them approximately 24 inches (61 centimeters) from the floor to align with typical mattress heights. Concealed wiring for sconces or outlets integrates seamlessly behind the structure.
Visuals illustrate the transformation: the bed wall forms a unified surface, with the suspended shelf or cabinet appearing weightless. Space below allows light to flow across the floor, accentuating wood grains and textures. Certain versions incorporate LED strips for gentle illumination, while others feature hardwood surfaces paired with soft-closing drawers. The outcome combines utility with composure.
A designer noted, "The floating style matches the way people live now. You can vacuum easily, and it keeps the eye level clean for art or headboards."
Design Details
- Materials: Solid oak, walnut-veneered plywood, or painted MDF, selected based on aesthetic and budget.
- Mounting: French cleats or hidden brackets supporting 50 to 100 pounds (23 to 45 kilograms).
- Finishes: Natural oils, matte polyurethane, or lacquer to harmonize with surrounding elements.
- Lighting: Underside LED strips, overhead sconces, or recessed puck lights.
- Storage: Options include a single drawer, open cubby, or hybrid; some incorporate cord management channels.
- Hardware: Subtle edge pulls or finger grooves to maintain the levitated appearance.
- Maintenance: Clean with a damp cloth and mild soap; steer clear of waxes that may dull matte surfaces.
Step by Step: Building Your Own Floating Nightstand
1. Plan the Layout
Measure from the floor to the mattress top, typically 22 to 26 inches (56 to 66 centimeters). Position the nightstand base one inch (2.5 centimeters) above this level. Ensure at least 8 inches (20 centimeters) of clearance between the bed edge and wall for cords or items.
Sketch designs proportional to your headboard. Pairs of matching units provide symmetry for queen or king beds; a single centered shelf suits tighter spaces.
2. Choose Materials
Opt for 3/4-inch (1.9-centimeter) oak or walnut plywood for a warm, stable natural finish. Select MDF for painted versions, priming all edges prior to application. Prioritize clean cuts to reduce sanding time.
Incorporate solid wood fronts for added texture and longevity. A grain-visible board imparts a custom-crafted quality without elaborate details.
3. Cut and Assemble the Box
Prepare the top, bottom, sides, and back panels. A compact unit measures 18 inches (46 centimeters) wide, 12 inches (30 centimeters) deep, and 6 inches (15 centimeters) tall. Secure joints with pocket screws or biscuits, clamping and gluing for square alignment before sanding smooth.
For drawers, construct from 1/2-inch (1.3-centimeter) plywood with full-extension soft-close slides. Affix a solid wood face to blend seamlessly with the frame.
4. Mount Securely
Identify studs using a finder. Fasten a horizontal French cleat to the wall with 2.5-inch (6.4-centimeter) screws. Attach the counterpart to the nightstand's rear for straightforward installation and removal.
Verify levelness prior to hanging. Gently test load-bearing capacity before placing objects.
5. Integrate Lighting and Power
Carve a shallow groove beneath the shelf for LED strips, linking to a concealed low-voltage transformer. For sconces, install vertical conduit behind the drywall. Position switches arm's reach from the bed.
Effective layers comprise:
- Task lighting for reading.
- Ambient under-shelf glow for navigation.
- Accent illumination to emphasize art or surfaces.
6. Finish for Durability
Sand to 220 grit across all areas. Apply two coats of clear finish on wood or primer and paint on colored surfaces, sanding lightly between layers after full drying. Select matte or satin sheens to resist fingerprints in subdued bedroom light.
7. Style with Purpose
Limit the surface to essentials like a lamp, book, or tray for small items. The void below expands perceived floor area. Introduce baskets or charging stations sparingly to preserve the airy essence.
Real World Examples
Compact City Bedroom
Location: Downtown apartment
Designer: Leon Hart Interiors
Photographer: Maya Grant
In a 120-square-foot (11.1-square-meter) space, slim walnut boxes mounted 10 inches (25 centimeters) high replaced bulky tables. Built-in LED strips provide a soothing nighttime glow.
"The idea was to make the furniture feel part of the wall," explained Leon Hart. "By lifting the tables, we could slide a storage bin or basket underneath when needed."
This adjustment visually and physically broadens the floor, making the room appear nearly a foot wider.
Family Home Refresh
Location: Suburban remodel
Designer: Kendra Vale Design Studio
Photographer: Studio North
To retain storage without bulk, the design features oak-veneered units with dual tiers and solid fronts on hidden brackets. Top drawers conceal chargers.
"The clients wanted to stop seeing cords," stated Vale. "We ran power through the wall so everything disappears."
Images capture the flawless fronts and subtle underlighting, aligning with the headboard for unified appeal.
Minimalist Guest Room
Location: Mountain cabin
Designer: Homeowner-built project
Photographer: Self-documented
Pine plank shelves on concealed steel brackets flank each bed, complemented by ceiling pendants. The wood's natural knots mirror the cabin's beams.
This budget-friendly option, under $200 per pair and completed in a weekend, delivers a light, dust-resistant presence that enhances the serene atmosphere.
Why Floating Nightstands Work
These designs alter spatial perception by permitting light to pass underneath, fostering depth. The wall integrates into the composition, emphasizing proportion and open areas over rigid aesthetics. This versatility suits modern and traditional interiors alike.
Practically, they streamline upkeep: vacuum or mop without relocation. Reduced clutter promotes smoother daily habits.
Smart Storage Moves
- Route a channel behind the back for cable concealment.
- Install drawer lips to secure contents during closure.
- Line drawers with felt for silent jewelry or glasses storage.
- Coordinate with sconces to maximize surface space.
- Apply contrasting accents, like dark hardware on pale oak, for definition.
Cost and Sizing Guide
Per-unit expenses depend on materials and components:
- Budget: Painted MDF, under $100.
- Midrange: Veneer with hardwood accents, $150 to $250.
- Premium: Solid wood with lighting, $350 to $600.
Allocate 18 inches (46 centimeters) width per side for queen beds; 14 inches (36 centimeters) suffices for essentials in compact areas.
Key Takeaways
- Layout: They liberate floor space and expand room visuals.
- Storage: Concealed features maintain tidy surfaces.
- Lighting: Multi-layer setups boost usability and ambiance.
- Materials: Select woods or paints to complement decor.
- Installation: Secure to studs with appropriate hardware.
These adjustments cultivate an intentional, comfortable bedroom environment.
Maintaining Long-Term Appeal
Integrated into the room's framework, floating nightstands influence movement and openness. Weekly dusting with a soft cloth suffices, alongside biannual screw checks and annual finish renewal through light sanding and application.