Why It Matters
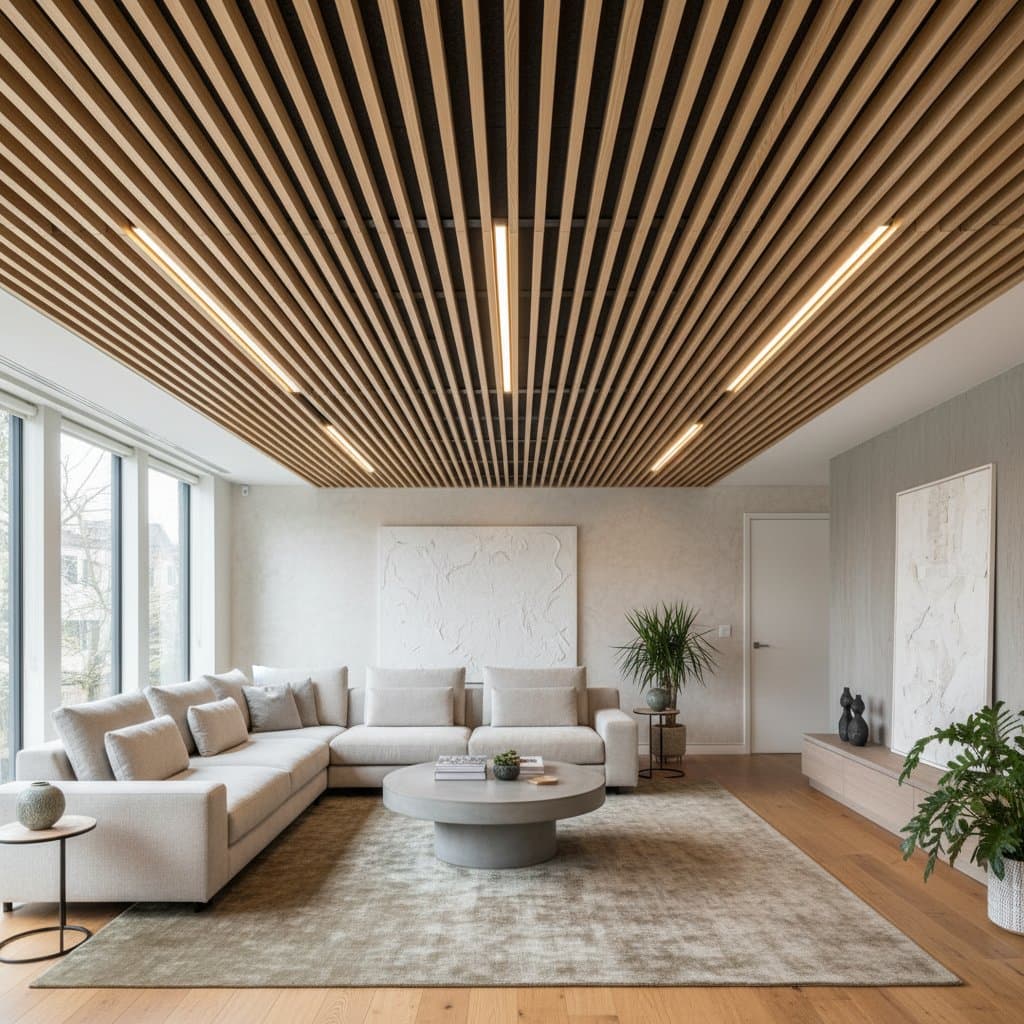
A slatted ceiling changes more than looks. It reshapes how a room behaves. Hard surfaces bounce sound, while the gaps between slats scatter it. Behind each slat, sound waves enter the absorbent panel and lose energy.
This combination reduces echo and background noise without heavy drapery or foam tiles. Designers describe the result as acoustic calm in shared areas. For homes with open kitchens or double height ceilings, the improvement is immediate. Voices remain clear while the space feels softer.
Stepwise Guidance for DIY Builders
Assess Your Room
Stand in the center and clap to test for long echoes that signal high reverberation. Measure ceiling height and note any obstacles. Keep the ideal clearance after installation above 8 feet. Choose slat direction based on the line of sight you want to emphasize.
Choose Your Materials
Select wood species that complement your flooring or furniture. Oak and walnut bring warmth, while birch or maple create a lighter tone. For a contemporary look, paint slats black or charcoal and pair them with light walls. Use prefinished boards to shorten build time. For acoustic panels, choose rigid mineral wool boards 1 to 2 inches thick.
Build the Frame
Mark ceiling joists with a stud finder. Screw 1x3 pine cleats across them at 16 inch centers. Fit acoustic panels tightly between cleats. Tape seams with acoustic fabric tape to prevent dust leaks. The panels can rest on small ledges or adhere with construction adhesive.
Attach Furring Strips
Install furring strips or aluminum channels perpendicular to the cleats to hold the slats. Keep spacing consistent to maintain even gaps. Leave access points for electrical junction boxes. Run conduit before mounting slats if you plan integrated lighting.
Mount the Slats
Cut slats to room width with a miter saw and sand edges lightly. Fasten each slat using brad nails or hidden clips while maintaining uniform gaps with a spacer block. Work from one side of the room to the other. Stagger end joints in large rooms for visual rhythm.
Add Lighting and Finishing Touches
Insert LED strips or downlights between chosen slats. Test circuits before closing sections. Finish edges at walls with narrow trim or a reveal. Apply a final coat of oil or clear finish if needed. Inspect lines for symmetry.
Smart Storage and Concealment Ideas
- Hide speaker wiring and smart home cables above panels.
- Mount small access hatches for maintenance.
- Integrate ceiling hooks for hanging plants or art without piercing slats.
- Use magnetic fixtures that attach through the gaps for flexible display.
Acoustic Performance in Practice
Sound tests show that a typical drywall ceiling reflects 80 percent of mid range frequencies. A slatted acoustic ceiling can cut that reflection by half or more. The difference becomes noticeable during conversations or calls. In a home office, sharper focus results from reduced background bounce. In living areas, music volume can stay lower while clarity improves.
Designer Lynn Cooper noted that people underestimate how much sound shapes comfort. Once the ceiling receives treatment, the entire room feels more grounded.
Aesthetic Options
Slatted ceilings fit multiple styles. Reclaimed barn wood brings texture and history to rustic spaces. Uniform maple slats paired with matte black lighting create precision in modern interiors. Whitewashed pine adds brightness for coastal homes.
Adjust spacing for mood. Narrow gaps feel sleek and continuous. Wider gaps show more shadow play. Align slats along a window wall to draw attention to natural light. Perpendicular lines can make a narrow room feel wider. Alternating directions in zones adds subtle variety in large areas.
Maintenance and Longevity
Wood slat ceilings hold up well when sealed properly. Wipe dust every few weeks and check connections annually. In humid zones, use kiln dried lumber and leave small expansion joints. Remove only a damaged slat without disturbing the rest. LED components last thousands of hours, so maintenance stays minimal.
The system remains flexible over time. Repaint or refinish slats, replace panels with higher NRC ratings, or add new lighting runs. This adaptability makes it a strong investment for evolving spaces.
Three Ways to Try the Idea
- Budget Version: Use plywood strips stained to mimic hardwood. Glue thin acoustic felt to the ceiling and nail strips through it.
- Midrange Upgrade: Combine solid pine slats with commercial acoustic panels and simple LED channels.
- Premium Build: Use custom milled oak slats with concealed clips, integrated dimmable lighting, and professional acoustic backing.
Benefits You Will Experience
Voices sound closer and more natural once the ceiling is complete. Music carries detail without echo. Light filters softly through the wood pattern and shifts through the day. The ceiling becomes something you notice not for its presence but for its calm.