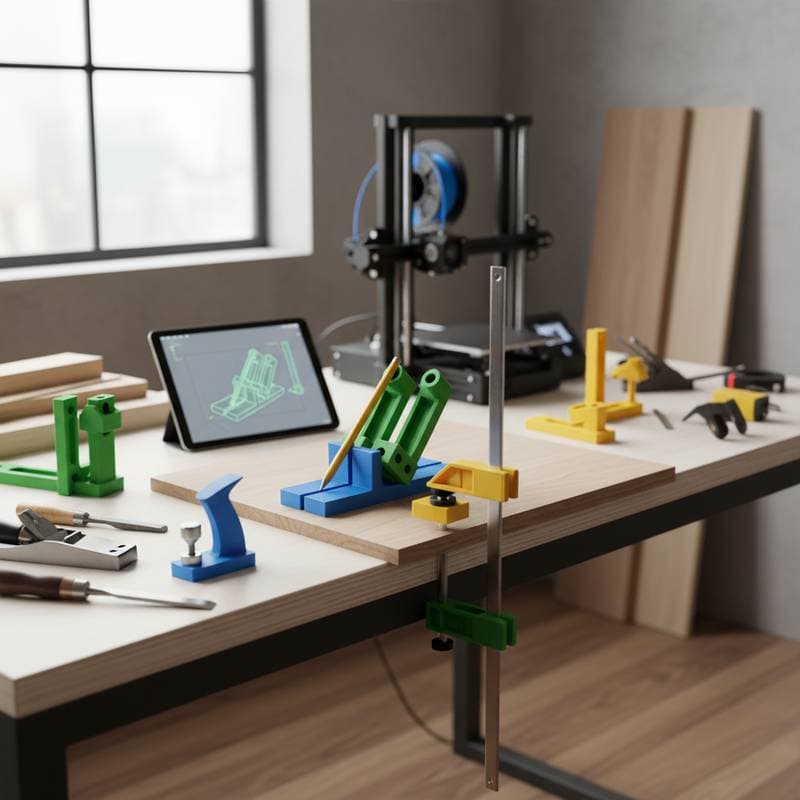
Unlock Professional Precision in Your Workshop with 3D-Printed Jigs
Creating a flawless dovetail joint once demanded extensive layout time and multiple test cuts. Today, a modest $40 desktop 3D printer paired with a free digital design file enables you to produce a jig that secures your board at the precise angle consistently. This innovation shifts decades of accumulated shop expertise into a compact, custom plastic device that fits seamlessly on any workbench.
3D-printed jigs reshape woodworking practices for both novices and seasoned professionals. These tools minimize preparation time, enhance cutting precision, and democratize intricate joinery techniques for users who simply initiate a print job. This article examines their mechanics, associated expenses, and practical applications to elevate the caliber of your upcoming furniture endeavors.
Why Woodworkers Embrace 3D-Printed Jigs
Conventional jigs crafted from plywood or medium-density fiberboard demand several hours of fabrication. Such materials degrade over time, expand due to humidity fluctuations, and necessitate exacting craftsmanship that often discourages entry-level enthusiasts. In contrast, a 3D-printed jig leverages computational precision to deliver reliable, reproducible outcomes.
The process begins with a digital model that specifies every dimension, angle, and interval. The printer deposits successive layers of thermoplastic filament, achieving tolerances as fine as 0.1 millimeter relative to the blueprint. This level of exactitude results in smoother cuts, snugger assemblies, and expedited alignments.
Consider a doweling jig produced via 3D printing: it positions drill bits with unerring alignment across successive boards. Rather than manually marking and measuring each hole, you secure the jig, bore the hole, and proceed to the adjacent workpiece. The resultant uniformity becomes evident right away, streamlining multi-piece constructions like cabinetry frames.
Key advantages include:
- Elimination of manual measurement inaccuracies through parametric digital designs.
- Retention of structural integrity in plastic components amid varying environmental conditions.
- Rapid reproduction of worn or damaged jigs, often within an hour, bypassing full reconstruction.
Practical starting point: Begin with a straightforward corner clamp or ergonomic sanding block. These projects consume less than $5 in filament and demonstrate the resilience of printed tools under typical workshop stresses, building confidence for more complex builds.
To further illustrate, hobbyists frequently adapt open-source designs from community repositories. A basic tenon jig, for instance, guides router bits to form consistent mortise-and-tenon joints. Print it in segments if your printer bed limits size, then assemble with screws for a modular setup that accommodates varying stock thicknesses.
Breaking Down Costs and Budgeting
Entry into 3D printing requires a foundational printer costing around $250, supplemented by initial filament spools at $60 total. Many users offset this investment after fabricating just three or four jigs that supplant pricier off-the-shelf alternatives.
Standard expense outline for a single jig:
- Filament usage: $3 to $8, depending on size and density.
- Electricity consumption: $0.25 to $1 per print session.
- Design phase: Approximately one hour using intuitive software like Tinkercad.
- Upkeep: Minimal, as printers endure thousands of hours with basic cleaning.
Commercial equivalents, such as a box-joint jig, command prices exceeding $150. A bespoke printed counterpart matches this performance for under $10 and allows modifications for specific board dimensions or blade offsets. Cumulative economies emerge when producing variants or refreshing components like guide bushings.
Strategies to optimize expenditures:
- Collaborate with fellow woodworkers to share bulk filament purchases.
- Maintain filament in airtight bins to shield against ambient moisture absorption.
- Repurpose printing failures by grinding them into reusable pellets, compatible with certain extruder setups.
Prioritize reputable filament brands to sidestep issues like uneven extrusion or brittle finishes. Inferior options risk structural failure when subjected to the clamping forces common in joinery tasks, potentially compromising workpiece integrity.
For long-term savings, integrate 3D printing into routine workflows. Track filament efficiency by weighing spools before and after jobs, refining designs to minimize material waste. Over time, this approach not only cuts costs but also fosters a library of personalized tools tailored to recurring project needs.
Avoiding Common Pitfalls in 3D Jig Fabrication
Even proficient users encounter errors that undermine jig performance. Addressing these proactively ensures reliable results.
- Scale discrepancies: Overlooking printer calibration can yield undersized or distorted components. Always print a calibration cube measuring 20 millimeters on each side to confirm accuracy before tackling essential jigs.
- Inadequate infill density: Settings below 10 percent may cause deformation under load. Target 30 to 50 percent for jigs enduring clamps or vices, selecting grid or gyroid patterns for balanced strength and lightness.
- Suboptimal print orientation: Positioning a jig flat on its side exposes layer lines to shear forces, inviting cracks. Orient vertically or at angles that align fibers parallel to expected stresses, enhancing durability.
- Omission of trial assemblies: Proceed directly to final stock only after verifying the jig's fit on scrap material. This step uncovers tolerances issues without risking premium lumber.
- Overlooking contact zones: Plastic wears quickly against cutting tools. Reinforce high-friction areas with embedded brass inserts or design modular pads that swap out easily.
Rectifying these early prevents filament squander and safeguards your projects from misalignment. Regularly audit your slicer software settings, such as bed leveling and flow rates, to sustain peak printer condition.
Essential Techniques for Optimal Results
Position your printer in an environment with consistent temperatures between 18 and 25 degrees Celsius. Abrupt airflow variations provoke delamination between layers. If your workspace cools significantly, fabricate or purchase an enclosure to insulate the unit.
Incorporate identification during the design stage by etching labels or adding embossed text. This practice simplifies retrieval amid a growing collection of specialized jigs, such as those for specific router bits or drill diameters.
Preserve jigs by stacking them horizontally in shaded storage. Exposure to sunlight accelerates degradation in materials like PLA, which softens above 60 degrees Celsius. Keep them distant from heat sources to maintain shape fidelity over seasons.
For superior surface quality, employ a 0.2 millimeter nozzle diameter on reference faces. Pair this with reduced print speeds of 45 millimeters per second to yield finishes that require no post-processing, ideal for alignment guides.
Experiment with hybrid constructions: print the jig body in standard PLA, then reinforce load-bearing sections with PETG for added toughness. Test these combinations on low-stakes prototypes to refine your material palette.
Building and Sourcing Your Jig Library
Essential Resources
Access a wealth of free digital models through platforms like Thingiverse or Printables, where woodworkers share tested designs for dovetail guides, pocket-hole aligners, and edge-banding tools. Customize these in free software such as Fusion 360, adjusting parameters for your machinery's specifics.
Visualize outcomes by studying cross-sectional renders in your CAD tool. This preview reveals potential weak points, like thin walls prone to flexing, allowing preemptive thickening.
Customization Strategies
Tailor jigs to your setup by incorporating mounting holes for bench dogs or T-tracks. For repetitive tasks, design parametric files that scale automatically based on input dimensions, saving redesign efforts.
Incorporate user feedback loops: after initial use, measure any play in the jig and iterate the model accordingly. This iterative process refines tools progressively, yielding a personalized arsenal that boosts efficiency across projects.
Closing with Project Integration
Integrate 3D-printed jigs into your workflow to achieve consistent, professional results without the steep learning curve of traditional methods. Start small, scale your designs, and watch as these affordable innovations turn ambitious ideas into polished realities, enhancing both the joy and precision of woodworking.