Project Specifications
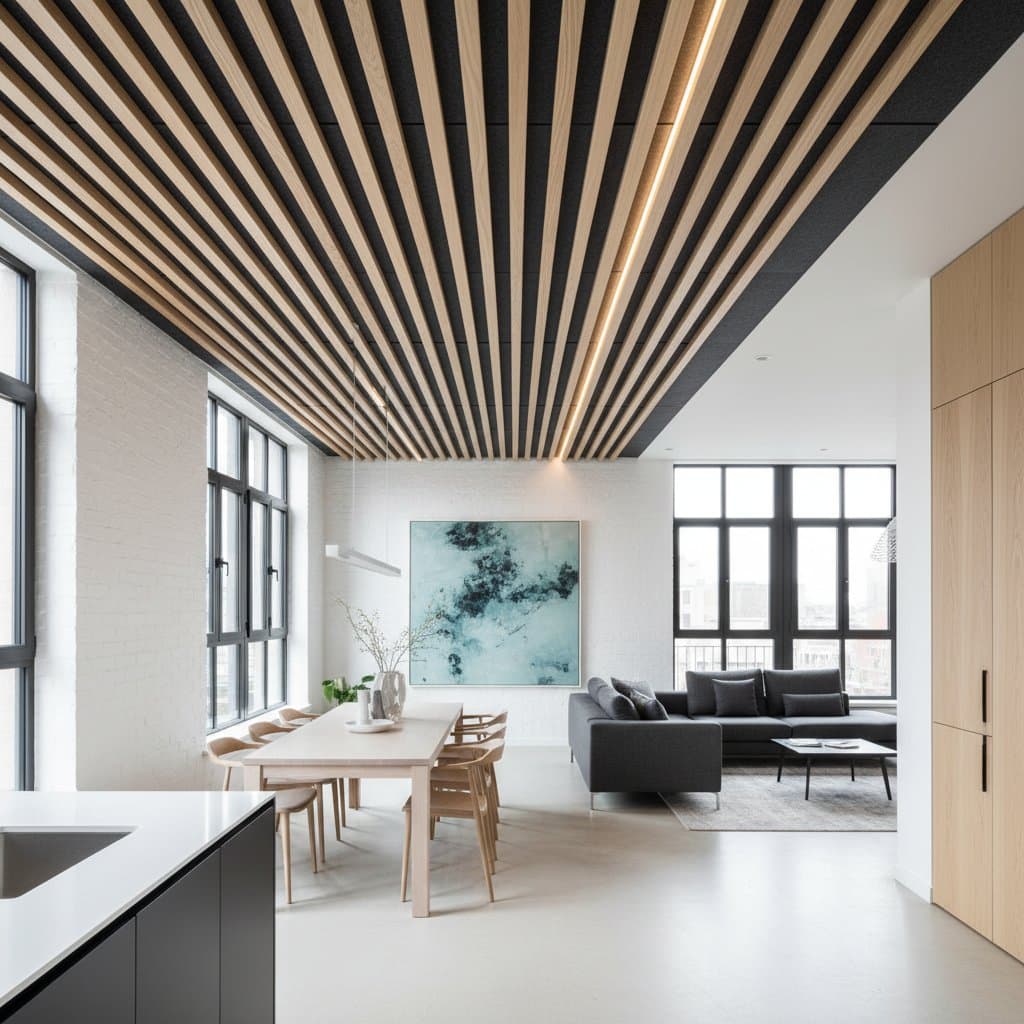
Suspended wood slat ceilings feature oak or similar hardwood slats paired with acoustic felt panels. The design creates a 6-inch (15-centimeter) air gap for optimal sound absorption. Key elements include:
- Wood slats: 1-inch by 2-inch oak strips, pre-finished in matte varnish for durability and warmth.
- Acoustic material: Black or gray felt panels, 1-inch thick, rated for noise reduction coefficient (NRC) of 0.85 or higher.
- Suspension system: Lightweight aluminum channels or furring strips, spaced 24 inches (61 centimeters) apart for slat support.
- Lighting: Continuous LED strips at 2700K color temperature, dimmable for adjustable ambiance.
- Cost range: 18 to 25 dollars per square foot (195 to 270 dollars per square meter), varying by material quality and installation complexity.
This setup absorbs mid-to-high frequency sounds effectively, reducing reverberation by up to 50 percent in typical rooms.
Understanding the Design
Open-plan living spaces often amplify noise, turning conversations into background clamor and media playback into muddled audio. Suspended wood slat ceilings address this issue by introducing sound-absorbing layers without enclosing the area. The slats diffuse sound waves visually and acoustically, while the underlying felt traps echoes.
Homeowners appreciate the balance of function and form. The wood introduces natural texture that complements both contemporary and traditional decor. Installation requires basic tools, making it accessible for weekend projects, yet the result rivals professional acoustic treatments.
Consider the physics: Sound bounces off hard surfaces like drywall or concrete, creating reverb. The air gap and porous materials in this ceiling convert those waves into minimal heat, fostering quieter environments. Rooms feel larger and more inviting as a result.
How to Install a Suspended Wood Slat Ceiling
Select a room plagued by echo, such as a kitchen or living area. Measure the ceiling dimensions and sketch the layout. Orient slats parallel to the longest wall to elongate the space visually, or perpendicular for a more intimate scale.
Step 1: Construct the Support Grid
Locate ceiling joists using a stud finder. Secure furring strips or metal channels perpendicular to the joists, spacing them 16 inches (41 centimeters) on center. Employ a laser level to ensure plumb alignment across the entire surface. This framework bears the weight of panels and slats, typically under 5 pounds per square foot.
Step 2: Position Acoustic Panels
Measure and cut felt panels to span the grid openings. Apply construction adhesive along edges or use screws with wide washers for secure attachment. Position panels without compressing the material, preserving its porous structure for maximum sound capture. Overlap seams slightly to prevent gaps that could allow sound leakage.
Step 3: Mount the Wood Slats
Finish slats in advance with a clear sealant to protect against moisture and simplify upkeep. Attach them to the grid using hidden clips or countersunk screws, maintaining 0.5-inch (1.3-centimeter) gaps for light diffusion and acoustic performance. For maintenance access, incorporate magnetic latches on select slats near fixtures or vents.
Step 4: Incorporate Lighting Elements
Route low-voltage wiring through the grid before finalizing panels. Install LED strips along the slat undersides or recessed spots between gaps. Opt for warm 2700K tones to harmonize with wood hues. Test dimmer functionality to ensure even illumination, directing light downward or across the plane for subtle ceiling glow.
Step 5: Finalize the Installation
Inspect for levelness and secure any loose components. Clean surfaces with a soft cloth to remove debris. Apply additional sealant around edges if installing in humid areas. Allow 24 hours for adhesives to cure before full use.
Real-World Advantages
Upon completion, the transformation becomes evident. Speech gains clarity, eliminating the need to raise voices during gatherings. Audio systems deliver precise tones, free from harsh reflections. The slats impose a rhythmic pattern that zones the space subtly, guiding the eye without physical barriers.
One homeowner noted the shift in daily routines. “It changed how we use the room,” Jensen shared. “We cook and talk at the same time now without competing noise.” Beyond acoustics, the ceiling conceals imperfections like exposed ducts, wiring, or outdated textures, refreshing older homes efficiently.
The design enhances perceived height through its open gaps, unlike solid panels that can feel oppressive. In evenings, integrated lighting casts a gentle ambiance, ideal for relaxation.
Complementary Organization Strategies
Pair the ceiling with ground-level enhancements to amplify serenity. These additions maintain visual cohesion and practicality:
- Install floating shelves lined with LED strips, mirroring the ceiling's linear motif.
- Position low-profile cabinets to serve as flexible dividers in multifunctional areas.
- Integrate hidden charging stations within drawers, preserving surface minimalism.
- Add wall panels in oak veneer for seamless acoustic extension.
Such integrations create a unified aesthetic, promoting calm amid open layouts.
Potential Drawbacks and Solutions
This ceiling reduces overhead clearance by about 6 inches (15 centimeters), best suited to rooms exceeding 8 feet (2.4 meters) in height. Plan around existing fans or lights to avoid conflicts; adjustable pendants may require shortening. In moisture-prone zones like kitchens, select treated woods and incorporate ventilation slits.
Precision demands time and tools, including saws and levels. Budget for professional assistance on the grid if carpentry experience is limited, then handle slat finishing personally to control costs. Overall, the investment yields long-term comfort outweighing initial effort.
Key Installation Insights
- Combine wood slats with felt for effective sound control and airy aesthetics.
- Maintain a 6-inch (15-centimeter) drop to optimize performance without crowding.
- Embed LEDs to enhance utility and mood.
- Pre-treat wood for ease and uniformity.
- Adapt the pattern to suit modern minimalism or rustic charm.
Upkeep Essentials
Address dust accumulation monthly using a microfiber extension tool on slats. For thorough cleaning, employ a slightly damp cloth followed by drying. Annually review fasteners for stability, tightening as needed. Replace individual damaged slats or panels with minimal disruption, ensuring sustained performance.