Acoustic Wood Slats: The Leading DIY Ceiling Solution for 2026
Ceiling renovations often receive less attention than wall or floor updates, but acoustic wood slats shift that focus. These panels serve multiple purposes: they absorb sound to minimize echoes, conceal imperfections in existing ceilings, and introduce a layer of visual warmth to interiors. Homeowners achieve these benefits through a straightforward weekend project, with total costs ranging from $8 to $15 per square foot.
The appeal lies in their versatility for various room types, from open-concept living areas to home offices. Installation requires basic tools and minimal expertise, yet the results rival professional work. This approach allows individuals to customize spaces without extensive disruption to daily routines.
Understanding the Appeal of Acoustic Wood Slats
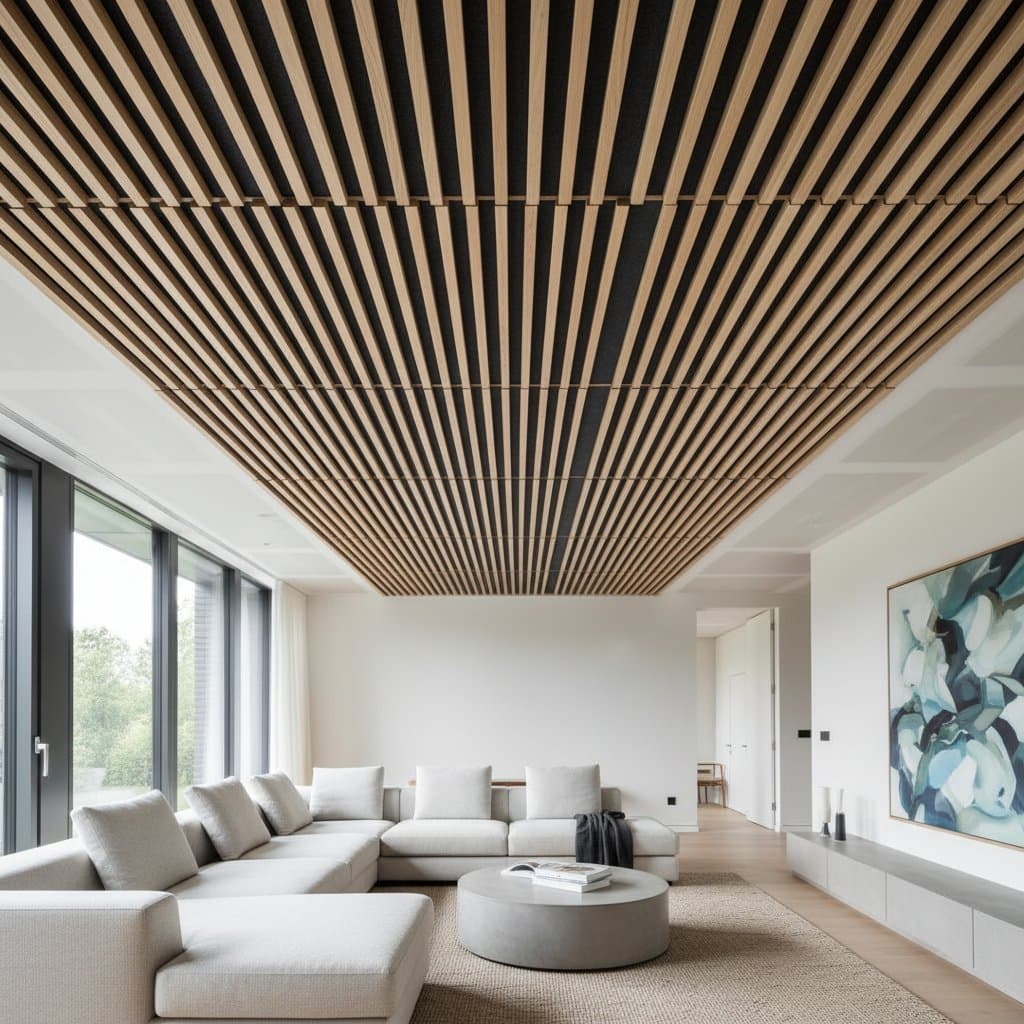
Acoustic wood slats integrate effective sound absorption with contemporary design elements. Each panel features slender wooden strips affixed to a backing of acoustic felt, typically black or gray for contrast. Sound waves enter through the intentional gaps between slats, where the felt material dissipates energy and prevents reflection, achieving absorption rates of 60 to 80 percent for mid- and high-frequency sounds.
This performance proves particularly valuable in environments with hard surfaces, such as tile floors or bare walls, which amplify noise. The slats suit open floor plans by creating zones of acoustic comfort without altering the room's openness. Beyond functionality, the panels enhance aesthetics through clean, linear patterns that draw the eye upward.
Select from a range of woods including oak for durability, walnut for richness, maple for a light tone, or even painted options for bold statements. These choices adapt to diverse styles, from cozy rustic settings to sleek minimalist designs. The felt backing not only supports acoustics but also ensures the wood's natural grain remains prominent.
Planning action: Begin by measuring the ceiling's dimensions accurately. Calculate the total square footage and decide on panel orientation, aligning slats parallel to the room's longest wall or natural light sources to optimize visual flow and perceived spaciousness.
Detailed Cost Breakdown and Budget Strategies
For a standard bedroom ceiling measuring 10 by 12 feet, anticipate expenses between $400 and $900, depending on material selections. Basic pine or veneer panels keep costs near the lower end, while premium hardwoods like walnut push toward the higher range. The DIY format saves significantly, as hiring professionals incurs additional fees of $4 to $6 per square foot for labor alone.
Factor in supplementary materials such as adhesives, fasteners, and tools if not already owned. Prefinished panels eliminate the need for on-site finishing, reducing both time and potential errors. Bulk purchases from suppliers often yield discounts, dropping the per-square-foot price below $10.
Budget optimization strategies:
- Opt for prefinished panels to avoid the labor and cost of staining or sealing.
- Purchase in bulk to access volume pricing and free shipping thresholds.
- Integrate partial slat coverage with complementary acoustic tiles painted to match walls, creating a layered effect at reduced expense.
Maintain quality in essential areas: invest in sturdy fasteners and precise alignment tools to prevent sagging or visual inconsistencies that could compromise the installation's longevity.
Step-by-Step Installation Guide
Preparation forms the foundation of a successful project. Acclimate the wood panels in the installation room for at least 48 hours to match ambient humidity and temperature, minimizing risks of warping or contraction. Gather necessary tools: a level, measuring tape, ladder, acoustic-rated adhesive, finishing nails, and a miter saw for custom cuts.
Surface Preparation
Inspect the ceiling for cracks, loose paint, or protrusions, and repair as needed with spackle or joint compound. Clean the surface thoroughly to ensure strong adhesion. If covering an existing drop ceiling, remove tiles and secure the grid framework.
Panel Layout and Attachment
Mark guidelines on the ceiling using a chalk line, spacing slats evenly at 1/2 to 1 inch apart based on the panel design. Start from one corner, applying adhesive to the felt backing in a zigzag pattern. Press panels firmly into place, using nails for additional support along edges if the ceiling structure permits.
Work in sections to maintain alignment, checking with a level after every few panels. For irregular shapes or fixtures, cut panels to fit using the miter saw, wearing safety gear to protect against dust. Avoid installing over moisture-heavy areas like kitchens unless using treated wood; consult local codes for compliance with fire sprinklers or wiring.
Finishing Touches
Once all panels secure in place, step back to assess uniformity. Fill any minor gaps with wood filler matched to the slat color, then lightly sand for smoothness. The installation typically completes in 8 to 12 hours for a medium-sized room, allowing immediate use afterward.
Expert recommendations:
- Employ acoustic-rated adhesives to preserve sound-dampening properties without compromising the felt.
- Test a small area first to verify adhesion strength on your specific ceiling material.
- Incorporate LED strip lighting behind slats for subtle illumination if wiring allows.
Maintaining and Enjoying Acoustic Wood Slats
After installation, these panels contribute to a serene, museum-quality ambiance in everyday spaces. Conversations flow more clearly without competing echoes, and ambient noises like footsteps or appliances fade into the background. The design elevates the room's overall perception, making it feel more inviting and refined.
Routine care involves gentle dusting with a microfiber cloth or soft brush attachment on a vacuum, performed monthly to prevent buildup. Avoid harsh chemicals or excessive water, which could damage the felt backing. In high-traffic areas, inspect annually for loose slats and resecure as necessary.
Over time, the panels age gracefully, developing a patina that enhances their warmth. This low-maintenance feature ensures long-term value, with many installations lasting over a decade. Homeowners report improved focus in work areas and relaxed gatherings in living spaces, underscoring the practical benefits of this upgrade.