
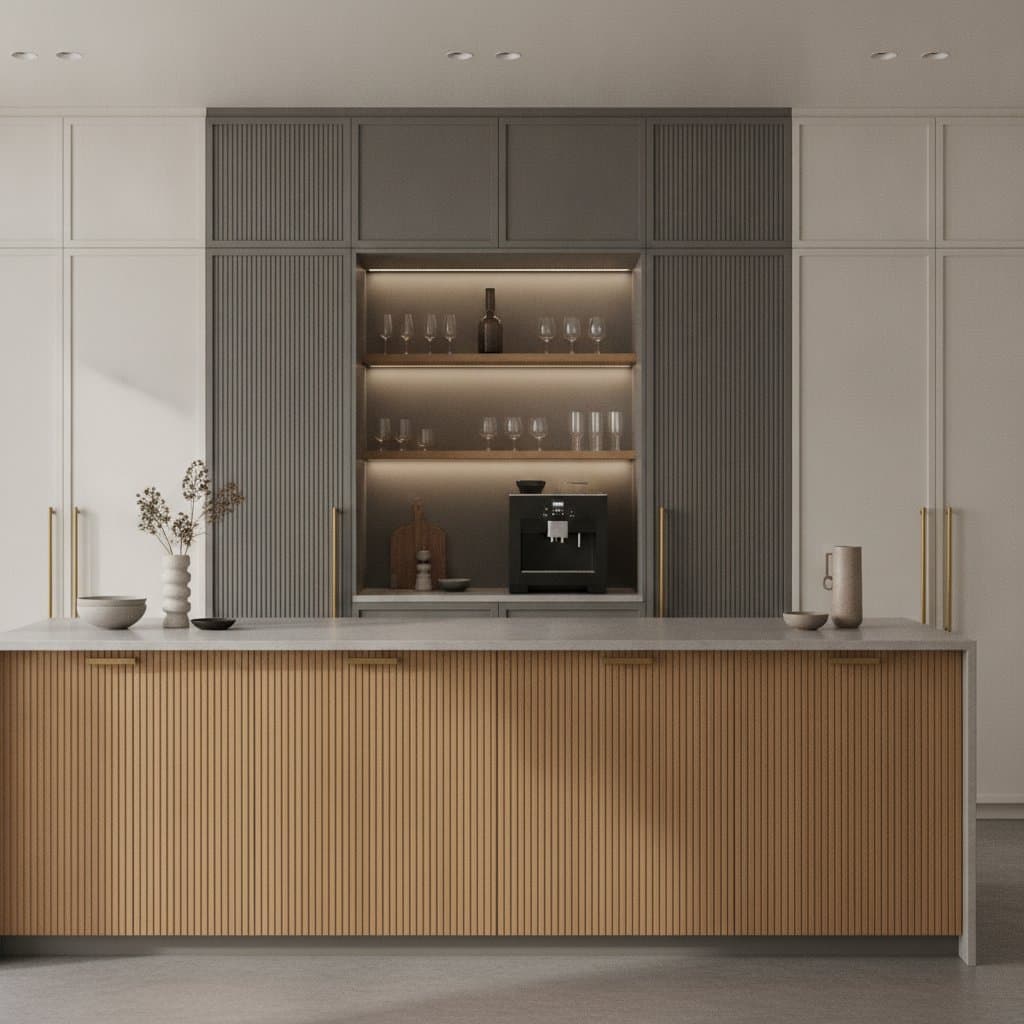
Ribbed Cabinet Fronts Transform Kitchen Design
Smooth slab doors have dominated contemporary kitchens for years. Now ribbed cabinet fronts are adding a controlled layer of shadow, rhythm, and tactile warmth without making a room feel busy. The defining move is simple. Keep the cabinet layout efficient, then give selected doors a three dimensional surface that changes as light moves across it.
For homeowners, the appeal is practical as well as visual. Textured cabinetry can soften large expanses of storage, add depth to a flat wall, and create a focal point around an island or beverage station. The strongest applications use ribbing selectively, with calm finishes and clear sightlines doing the supporting work.
At a Glance
Ribbed fronts use repeated vertical or horizontal channels molded, routed, laminated, or applied to a cabinet door. Profiles range from fine fluting that reads as a soft line from across the room to deeper grooves that create strong alternating bands of light and shade.
The trend suits kitchens that need visual warmth without ornate decoration. It also works in compact rooms because vertical ribs can make a cabinet wall feel taller, while narrow profiles preserve the clean geometry associated with modern cabinetry.
A typical kitchen island measures about 7 feet long and can accommodate ribbed doors on the seating side, the sink cabinet, or a centered feature bank. Full height cabinet walls often run from 8 to 12 feet, giving texture enough room to register without competing with every other finish.
Before
Many kitchens begin with a familiar problem. Too much uninterrupted cabinetry. A wall of smooth doors may provide excellent storage, yet it can appear visually flat, especially when paired with a hard surface floor, stone counters, and limited natural light.
The opposite problem is excess pattern. When tile, counters, flooring, hardware, and cabinet doors all demand attention, daily tasks become harder to organize visually. Ribbed cabinet doors solve the blank wall problem only when the surrounding palette remains disciplined.
Homeowners also need to consider cleaning. Deep channels can collect flour, dust, and cooking residue, so door profile and placement matter. A lightly textured pantry door may be easier to maintain than a heavily fluted door beside a cooktop.
After
The most successful kitchens treat ribbed cabinetry as an architectural accent. A designer might use fluted doors on the island while keeping the perimeter cabinets smooth, or place textured fronts on a tall storage tower that frames an opening to the dining area.
Photos of these rooms typically show the effect in layers. From a distance, the cabinet face reads as a quiet vertical field. Up close, the grooves reveal changing shadow lines, a matte finish, and the precision of the door construction. Under pendant lights, the ribs become more pronounced. In daylight, they create a softer, shifting pattern.
Layout remains the first decision. Maintain work aisles of about 42 inches in a single cook zone and about 48 inches where two people regularly pass. Ribbed fronts should not force a compromise in drawer access, appliance clearance, or landing space beside a range.
Texture also helps define zones. A ribbed island can signal food preparation and seating, while smooth perimeter doors recede behind the work area. A textured tall cabinet can mark a coffee station, bar, or concealed appliance garage without adding a separate room.
Design Details
Choose the Profile
Fine fluting creates a refined surface with low visual contrast. Wider ribs create a stronger architectural statement and may suit a generous island or a room with high ceilings. Ask for a sample at least 12 by 12 inches, then view it in morning, afternoon, and artificial light.
The profile should match the scale of the kitchen. A narrow galley can benefit from shallow vertical grooves, while a large open plan room can carry deeper channels on a broad island. Horizontal ribs can widen a feature, but vertical lines usually support the sense of height and make upper cabinets feel less heavy.
Control the Palette
Ribbed doors already provide pattern, so color can remain quiet. Warm white, mushroom, clay, olive, natural oak, and smoked wood tones let shadow do the work. A low sheen finish reduces glare and makes the surface easier to read.
The designer said the choice of a muted finish keeps the texture visible without turning the island into a high contrast focal point. That balance matters in open plan homes, where the kitchen must connect with living and dining areas.
For a warmer result, pair painted ribbed fronts with oak shelves or a wood hood. For a more tailored room, match the ribbed doors to the perimeter cabinets and use lighting to separate the surfaces. Stone counters with restrained veining prevent the cabinetry from competing with the backsplash.
Plan Hardware Carefully
Long pulls emphasize vertical ribs, while small knobs can interrupt the rhythm. Integrated pulls, recessed rails, and edge profiles produce a cleaner surface, but they must provide enough grip for heavy drawers.
On an island, consider placing hardware at a consistent height across doors and drawers. For tall doors, a pull around 18 to 24 inches long can make operation easier while reinforcing the vertical direction. Test the combination on a full size mockup before ordering.
Layer the Lighting
Texture needs light from more than one direction. General ceiling fixtures provide even illumination, under cabinet lighting supports food preparation, and pendants create a stronger wash across an island face.
Use at least two lighting layers in a small kitchen and three in a larger room. Shielded LED strips under wall cabinets reduce countertop shadows. Wall washers or adjustable recessed fixtures can graze tall ribbed doors, but aim them carefully. Light placed too close may exaggerate every groove and reveal unevenness.
A color temperature near 2700 to 3000 Kelvin usually keeps painted and wood surfaces comfortable rather than stark. Dimmers let you shift from bright task lighting to a softer evening setting.
Practical Choices for Textured Cabinetry
Before committing to ribbed cabinet doors, review the construction and the cleaning routine.
- Material. Veneered MDF, solid wood, laminate, and molded panels each produce different edge details and levels of stability.
- Depth. Shallow channels collect less residue and feel quieter. Deep fluting creates more shadow and needs more careful cleaning.
- Placement. Keep heavily textured fronts away from splash zones, range hoods, and areas where grease settles.
- Finish. A durable low sheen coating reduces fingerprints and helps the grooves retain a consistent appearance.
- Access. Use ribbing on doors, drawers, or end panels, but keep frequently used storage easy to open with one hand.
- Continuity. Confirm how the pattern meets at corners, drawer breaks, and appliance panels.
End panels deserve special attention. A ribbed island side can make the furniture feel finished from the dining area, but the pattern should continue cleanly around corners. If the door profile is applied to a thin panel, ask how the installer will protect edges from impact.
Budget and Maintenance
Costs vary by material, finish, profile depth, and whether the doors are custom made. As a planning range, textured replacement doors may add roughly $80 to $250 per door compared with basic slab fronts, while a fully custom kitchen can carry a broader premium across the entire cabinet package.
Maintenance is straightforward when the profile is chosen with use in mind. Dust lightly with a soft cloth, wipe spills promptly, and follow the finish maker's cleaning instructions. Avoid abrasive pads and excessive water. A narrow vacuum brush can help with deeper grooves, especially on a pantry or display cabinet.
The best return comes from using texture where it changes the experience. A ribbed island can hide visual wear on a high traffic seating side. A fluted appliance wall can give a necessary storage block a furniture like character. A small textured beverage station can add detail without refacing every cabinet.
Next Steps
Start with one surface, such as an island end, pantry bank, or tall cabinet pair. Compare samples at full scale, check clearances, test hardware, and locate textured fronts away from the messiest work zones.