
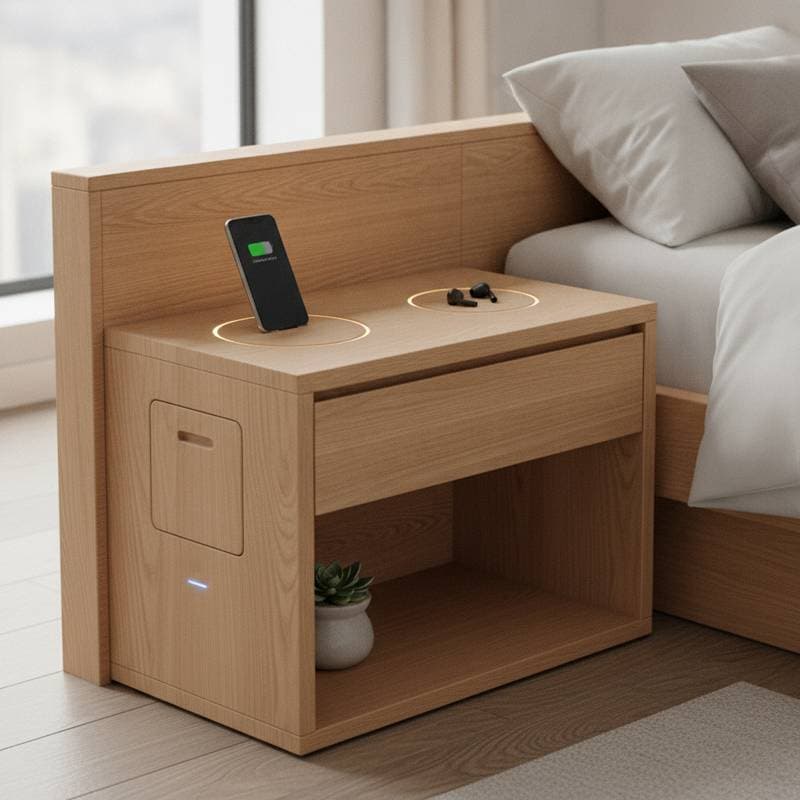
DIY Tables With Built In Wireless Charging Stations
A bedside table or side table can do more than hold a lamp. With a concealed wireless charging station, it can power your phone while keeping cords off the floor and your room looking cleaner. A basic build costs about $90 to $250, takes one to two weekends, and suits woodworkers with intermediate skills.
Wireless charging furniture combines woodworking, low voltage electrical work, and heat management. The safest design uses a certified charging module, a removable access panel, and a standard plug in power supply.
At a Glance
- Typical cost: $90 to $250 for a DIY table
- Build time: 8 to 16 hours, excluding finish curing
- Difficulty: Intermediate
- Best materials: Hardwood, plywood, threaded inserts, and heat resistant adhesive
- Charging target: 10 to 15 watts for most phones
- Best use: Bedside tables, entry tables, sofa tables, and compact desks
Plan the Table Around the Charger
Start with the charging module, not the tabletop. Most wireless charging pads work through wood up to about 1 inch thick, but thicker material can reduce charging speed or stop charging entirely. Check the manufacturer maximum surface thickness before cutting.
A recessed charging pocket keeps the module close to the phone and hides the hardware. Leave at least 1/8 inch of wood above the charger unless its instructions specify another measurement. Mark the charging zone with a small inlay, engraved circle, or contrasting wood insert so you can place your phone accurately.
Choose a table size that fits the room and the electronics. A useful bedside table is about 20 to 26 inches wide, 16 to 20 inches deep, and 22 to 26 inches high. Keep the charging area at least 3 inches from the table edge to protect it from spills and accidental bumps.
Choose Safe Charging Hardware
Use a wireless charging module certified by a recognized testing organization, such as Underwriters Laboratories, Intertek, or an equivalent regional laboratory. Look for foreign object detection, thermal protection, overcurrent protection, and compatibility with the Qi standard.
The charger usually connects to a low voltage power adapter. Do not modify the wall plug or route exposed household voltage through the table. A concealed cable channel can carry the adapter lead to a rear exit, while the power adapter remains accessible beneath or behind the furniture.
Before buying parts, verify the charging output, typically 5, 10, or 15 watts. Verify the required cutout diameter or rectangle. Verify the maximum material thickness. Verify the adapter voltage and current ratings. Verify whether the module needs ventilation.
A 10 watt module suits most phones and creates less heat than higher output hardware. If you want to charge earbuds or a watch, select a module designed for multiple devices rather than stacking unrelated chargers.
Build the Table Step by Step
A simple table can use a hardwood top, four legs, and an apron that supports the top. Plywood construction works well for a painted piece and can reduce material costs.
- Create a full size layout. Mark the charger, cable route, leg positions, and access panel before milling wood.
- Mill and sand the components. Keep the top flat, and ease exposed edges with a small roundover bit or sanding block.
- Cut the charging pocket. Use a router and template for a clean recess. Stop at the manufacturer recommended thickness.
- Route the cable channel. Make a shallow path from the charger to the rear leg or back edge. Avoid sharp bends that can pinch the cable.
- Dry fit the electronics. Confirm that the phone charges through the finished wood before applying glue or finish.
- Assemble the table. Use pocket screws, mortise and tenon joints, or dowels according to your skill level.
- Add an access panel. Secure it with screws or rare earth magnets so you can replace the charger without damaging the table.
- Apply finish after testing. Oil, water based polyurethane, or hard wax can work, but keep finish out of the charging pocket.
Leave a small ventilation gap around the module. Never cover the charger with foam, fabric, or a solid layer of adhesive that could trap heat.
Costs, Tools, and Budget Choices
A budget build typically costs $90 to $140. This range covers a basic charger, plywood or construction grade hardwood, fasteners, finish, and a power adapter. A midrange project costs $150 to $250 with better hardwood, a recessed module, stronger joinery, and a custom access panel.
Plan for these expenses. Wireless charging module and adapter costs $25 to $80. Wood costs $35 to $120. Finish and abrasives cost $15 to $35. Screws, inserts, and cable hardware cost $10 to $25. Router bit or template costs $10 to $40.
You can save money by choosing a simpler leg design or using quality plywood. Do not cut costs on the charger, power adapter, strain relief, or insulation. These components affect safety and service life.
DIY or Professional Help
DIY is reasonable if you can safely use a router, drill, measuring tools, and basic joinery equipment. Allow 8 to 16 hours for layout, cutting, assembly, sanding, testing, and finishing.
Hire a qualified electrician if the project requires a new wall outlet, hardwired power, or changes to household wiring. A furniture maker can help when the table uses complex joinery, stone, metal, or a thin top that leaves little room for the charger.
Before hiring anyone, request proof of licensing where required, liability insurance, a written scope, and a clear repair plan if the charger fails. Ask who supplies the module and who handles warranty service.
Common Mistakes to Avoid
The most common error is cutting the recess before checking the charger thickness limit. Test the module under the actual tabletop material, including finish, before final assembly.
Other frequent problems include routing cables too close to edges where they can be pinched. Another problem is using non certified chargers that lack proper safety features. Another problem is skipping the access panel, which makes future repairs difficult. Another problem is applying finish inside the charging pocket, which can interfere with charging performance.
Service and Maintenance
Check the charging performance every few months. Clean the charging surface with a dry cloth to remove dust and oils. Inspect the cable connections for wear or damage. Replace the module if charging becomes slow or inconsistent.
Keep the access panel screws or magnets in good condition so you can reach the charger quickly when needed. Store the original packaging and documentation with your project files for future reference.
Final Assembly Tips
Test the complete assembly before applying the final finish. Place your phone on the charging zone and confirm it charges properly through the finished wood. Make any adjustments to the recess depth or cable routing while the table is still easy to modify.
Secure all cables with appropriate strain relief to prevent movement during normal use. Position the power adapter where it can be reached without moving the table. Label the access panel location on the underside so future owners know how to service the charging system.