Achieving Flawless Miter Joints for Waterfall Countertops
A well-executed waterfall edge captures attention with its fluid transition from the countertop surface to the vertical panel. This design mimics the natural drape of material, whether wood or stone, and demands meticulous attention to detail. Precision in miter joints ensures the grain or veining appears uninterrupted, preserving the elegant illusion while providing lasting durability. Professionals who perfect this technique deliver projects that stand out in quality and command higher value.
Understanding the Waterfall Edge
The waterfall edge features a continuous slab that bends seamlessly from horizontal to vertical at a right-angle corner. This style appears frequently in kitchen islands, bathroom vanities, and custom cabinetry, where it adds a modern, sculptural element. At its core lies the miter joint, formed by two surfaces cut at exact 45-degree angles that align without gaps.
Success hinges on balancing aesthetic appeal with mechanical reliability. Any visible seam disrupts the visual flow, while insufficient bonding risks separation under daily use. Fabricators must prioritize accurate measurements, material matching, and secure fastening to meet these demands.
Homeowners view impeccable waterfall edges as a hallmark of superior workmanship, often increasing perceived project worth by 20 to 30 percent. Mastering this skill minimizes rework, such as repairing cracks or mismatched patterns, and builds a reputation for excellence.
Action step: Select scrap pieces matching your project material and practice 45-degree cuts. Aim for joints that fit tightly without force, using a square to verify perpendicular alignment.
Precision Cutting Techniques for Miters
Accurate cuts form the foundation of invisible joints. Deviations as small as 0.5 degrees can produce noticeable offsets, compromising the overall effect.
Wood fabrication approaches:
- Employ a table saw equipped with an 80-tooth carbide blade for clean, splinter-free edges.
- Secure the workpiece with a precision miter gauge or digital fence, calibrated using a high-accuracy angle finder.
- Perform initial passes at reduced speed to minimize tear-out, followed by light sanding with 220-grit paper if needed.
Stone fabrication methods:
- Utilize a bridge saw with diamond-tipped blades and continuous water feed to cool the material and reduce dust.
- Set the blade angle via CNC controls or manual stops, double-checking with a protractor for exact 45 degrees.
- Post-cut, polish edges sequentially with 200-, 400-, and 800-grit diamond pads to achieve a smooth, reflective surface.
Always clean cut edges immediately with a soft brush and isopropyl alcohol to remove debris. This preparation enhances adhesive performance and prevents contamination.
Action step: Assemble a dry fit on a level workbench and inspect under strong, angled lighting. Adjust your setup if shadows or light pass through the joint.
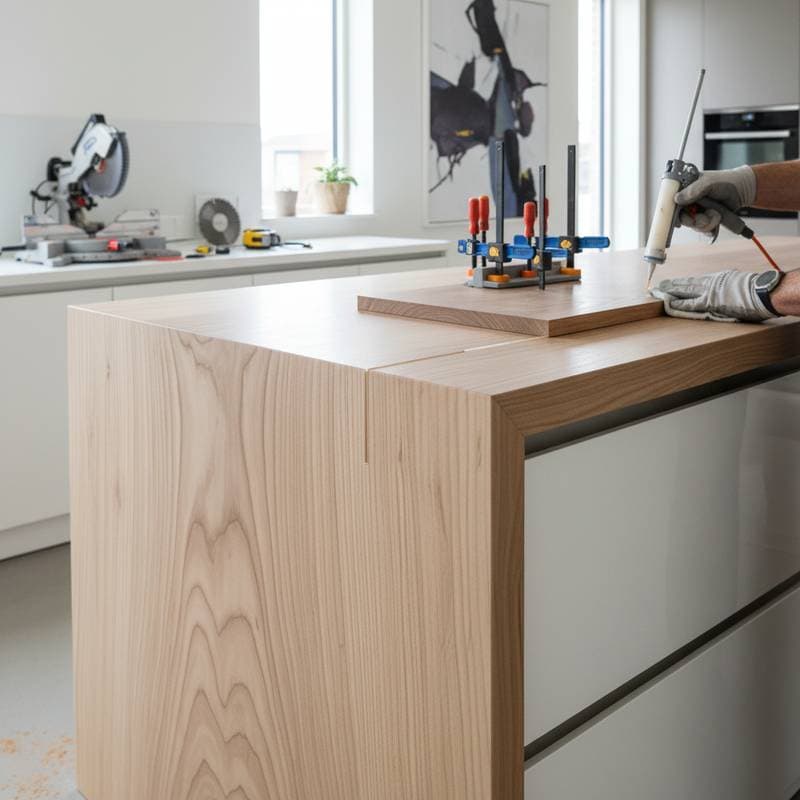
Assembly and Adhesive Strategies
Once cuts align perfectly, assembly secures the joint's integrity. Choose adhesives based on material type to ensure long-term adhesion without altering appearance.
For wood, apply a two-part epoxy or polyurethane glue formulated for high-strength bonds. Spread a thin, even layer using a precision applicator, avoiding excess that could squeeze out and mar surfaces. Clamp gently with bar clamps padded to prevent dents, applying pressure in stages over 24 hours.
Stone requires color-matched epoxy resins, often translucent for quartz or pigmented for marble. Mix according to manufacturer ratios and work quickly, as curing times vary from 30 minutes to several hours. Use masking tape along the joint line to contain squeeze-out, removing it before full set.
Test the bond's strength after curing by applying moderate torque; it should resist without flexing. This step confirms readiness for installation.
Action step: Document your adhesive application process with photos for reference in future projects, noting cure times and environmental conditions like humidity.
Budget Considerations for Waterfall Projects
Waterfall edges involve higher material and labor inputs compared to basic edging, yet they yield substantial returns in aesthetics and market appeal.
Wood-based estimates:
- Material costs range from $40 to $75 per linear foot, influenced by hardwood selections like walnut or oak.
- Fabrication labor totals $300 to $700 per corner, covering cuts, assembly, and initial finishing.
- Additional finishing, including oil application and buffing, adds about $100.
Stone-based estimates:
- Materials cost $85 to $150 per linear foot for options such as granite or engineered quartz.
- Labor for cutting, joining, and polishing reaches $500 to $1,200 per corner.
- Consumables like adhesives and polishing compounds account for $50 to $100 per joint.
To optimize expenses, source materials in bulk and practice on less costly substrates like plywood veneers. Reuse remnants for prototypes or secondary elements, and batch similar tasks to streamline tool setups.
Prioritize quality tools over shortcuts; dull blades lead to rework that erodes savings. Investing in calibration devices pays dividends through reduced waste.
Action step: Create a project budget spreadsheet that tracks costs by phase, allowing adjustments before committing to full production.
Avoiding Pitfalls in Miter Joint Execution
Even experienced fabricators encounter issues that undermine results. Awareness of these allows proactive prevention.
- Angle inaccuracies: Unchecked saw settings cause gapping. Calibrate equipment daily with digital tools.
- Adhesive deficiencies: Excessive clamping squeezes out glue, starving the bond. Use just enough pressure for contact without distortion.
- Pattern discontinuities: Failing to map grain before cutting results in jarring breaks. Plan layouts with full-slab templates.
- Surface imperfections: Neglecting fine sanding leaves micro-scratches visible post-finish. Progress through grits up to 600 for optimal smoothness.
- Premature handling: Disturbing joints before full cure invites shifts. Adhere strictly to specified drying periods, often 48 hours minimum.
Incorporate a pre-assembly inspection routine to catch errors early. This discipline preserves materials and time.
Action step: Develop a laminated checklist for your workspace, covering calibration, dry fits, and curing protocols. Review it at each project's start.
Essential Tools and Finishing Techniques
Success with waterfall miters relies on reliable equipment and methodical finishing.
Key tools include digital angle gauges for verification, precision clamps for even pressure, and LED lights for joint inspection. For finishing, apply sealants in thin coats: oil for wood to enhance grain depth, or penetrating sealers for stone to protect against stains.
Buff surfaces to a satin sheen, avoiding over-polish that highlights flaws. Test finishes on scraps to match desired luster.
Action step: Maintain a tool inventory log, scheduling sharpening and calibration to ensure consistent performance.
Delivering Lasting Impact Through Precision
Mastering miter joints for waterfall countertops transforms standard installations into signature pieces. This attention to detail not only satisfies clients but also elevates your portfolio. With practice, these techniques become second nature, enabling efficient production of high-end designs that endure.