Floating Vanities: Freeing Floor Space and Simplifying Cleaning
A surge in popularity surrounds floating vanities, which homeowners install to refresh bathroom designs. These wall-mounted units create an illusion of weightlessness, liberate floor area, and facilitate straightforward cleaning. Social media platforms feature tutorials that illustrate the conversion of basic plywood structures into sophisticated vanities equipped with integrated sinks and concealed storage compartments. Customization options, budget management, and the fulfillment derived from constructing a unique piece contribute to their widespread appeal.
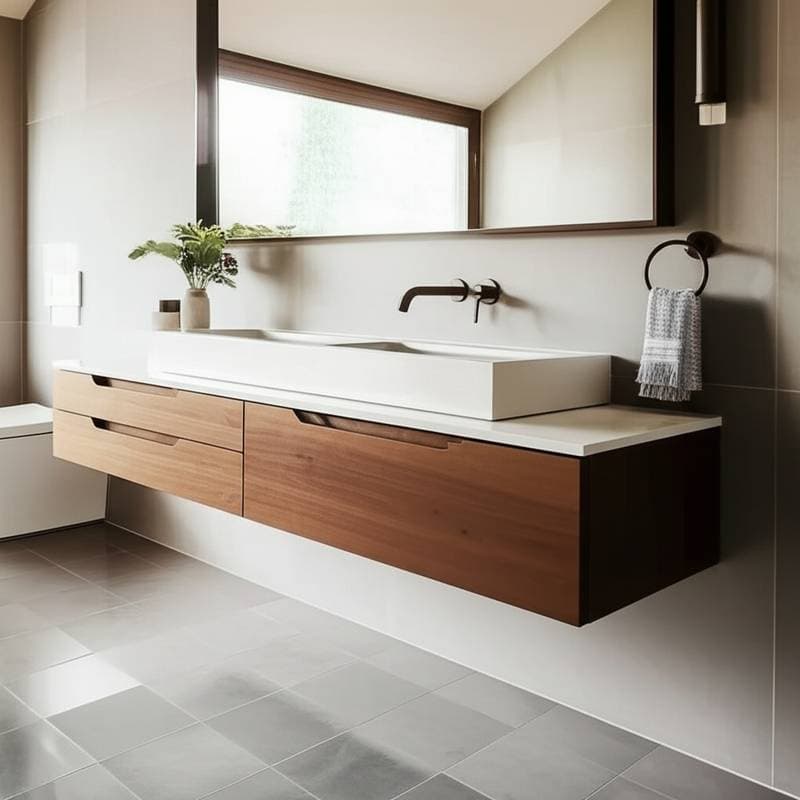
At a Glance
Homeowners: DIY enthusiasts and professional remodelers
Location: Suburban residences and urban apartments
Size: Typical dimensions measure 48 inches (122 cm) in width by 20 inches (51 cm) in depth
Design Teams: Independent craftsmen drawing inspiration from contemporary millwork experts
Photographer: Images provided by project participants and design professionals
Before Installation
Traditional bathrooms often incorporate cumbersome floor-standing cabinets that dominate visual space. Kick plates accumulate dust and retain moisture, while expansive drawers turn into disorganized storage areas. One homeowner described the previous vanity as "a heavy block sitting in a small room." The primary objective involved creating a lighter atmosphere and simpler upkeep without sacrificing functionality.
Common challenges encompassed:
- Insufficient floor clearance complicated mopping tasks.
- Inadequate lighting beneath cabinets produced shadowy areas.
- Standard retail vanities seldom coordinated with wall tiles or hardware elements.
After Installation
The introduction of floating vanities alters the dynamics of these spaces. Elevating the cabinet 10 to 12 inches (25 to 30 cm) above the floor instantly enhances brightness and perceived height. Installation of LED strips beneath the unit illuminates the tile floor with gentle light, serving as a nighttime pathway. Unobstructed views expand the sensation of space in compact bathrooms by approximately 20 percent, based on visual assessment.
Professionals construct these units from straightforward plywood or oak veneer boxes, securing them to wall studs via robust steel brackets. Plumbing integrates into a recessed chase, allowing the vanity to appear suspended. Drawers operate on soft-close mechanisms, and countertops feature materials such as quartz, concrete, or solid surfaces. This approach yields a bespoke appearance suitable for a weekend project.
One designer noted that the floating configuration "matches how people live now, with less clutter and more visibility underfoot." The elevated design directs attention upward, emphasizing tile motifs or wall-mounted mirrors rather than substantial cabinet bases.
Design Specifications
- Materials: Birch plywood, white oak, walnut, and moisture-resistant MDF excel when protected by polyurethane or hardwax oil sealants.
- Mounting: Heavy-duty concealed brackets, positioned at 16-inch (41 cm) intervals, ensure stable attachment.
- Lighting: Low-voltage LED tape delivering around 300 lumens per foot (30 cm) provides subtle underlighting.
- Storage: Drawers with 6-inch (15 cm) depths maintain accessibility for daily items while preserving a slender silhouette.
- Finishes: Matte lacquer or clear oil preserves the wood grain, harmonizing modern and organic aesthetics.
Each element supports the aim of streamlining daily activities. Towels remain dry, cleaning implements access every surface, and the bathroom evokes the tranquility of a compact spa.
Significance of the Trend
DIY floating vanities align with the growing preference for wall-mounted furnishings. They integrate seamlessly into modern and transitional decors. In confined apartments, these units uncover several square feet (about 0.3 square meters) of floor surface, boosting light bounce and ventilation. In spacious homes, they introduce structural definition and accentuate tile workmanship.
Online builder videos demystify the process, enabling homeowners to duplicate expert joinery techniques. Detailed instructions cover pocket holes, cleat installations, and final sanding steps, alleviating beginner concerns. Material expenses represent less than half the price of ready-made alternatives, particularly with precut plywood sheets.
Building Instructions for Home Use
- Determine the height. Position standard vanity tops at 34 to 36 inches (86 to 91 cm) from the floor. For floating models, calculate from the completed floor to the upper edge, accounting for countertop thickness.
- Identify studs. Fasten mounting cleats or metal brackets into sturdy framing. Install blocking behind drywall as needed for reinforcement.
- Construct the box. Employ dado joints or pocket screws to form secure corners. Test-fit drawers prior to applying finishes.
- Protect all edges. Coat surfaces with two layers of polyurethane or a water-resistant sealant to avert expansion from humidity.
- Incorporate lighting. Affix LED strips to the underside and wire them to a low-voltage driver concealed within the cabinet.
These procedures suit builders with intermediate skills, while permitting personalization through refined touches.
Essential Insights
- Floating vanities reduce visual bulk and accelerate cleaning processes.
- The elevated structure promotes air circulation and inhibits moisture accumulation.
- Basic joinery combined with readily available materials enables personalization at minimal expense.
- Under-cabinet illumination delivers functional radiance and enhances depth perception.
- This style complements a contemporary approach emphasizing simplicity and effectiveness.
Maintaining the Installation
After setup, upkeep proves uncomplicated. Clean surfaces periodically with mild soap solutions and steer clear of abrasive chemicals that might diminish sheen. Inspect brackets annually for secure fit, particularly under the load of substantial stone countertops. Substitute LED tape upon noticing reduced luminosity to sustain the defining soft glow on the floor.
Individuals who implement this design report a transformed spatial awareness. One participant explained how the continuous floor view beneath the vanity rendered the room "like it could breathe." This perceptual change, coupled with practical advantages, propels the trend forward.
Floating vanities demonstrate that modest structural adjustments yield substantial benefits. They illustrate how a reduced physical and visual presence optimizes bathroom performance on a daily basis.