Key Features
- Power Supply: Low-voltage transformer hidden inside a closet cabinet for discreet operation.
- Installation: Seamless continuous runs featuring magnetic access panels at joints for easy adjustments.
- Maintenance: Clip-in diffuser lens enables straightforward LED strip replacement without disturbing the trim.
Craftsmen miter, sand, and prefinish every joint prior to assembly. Position the trim slightly offset from the wall to form a slim reveal that serves as the light's exit path. Electricians route wiring along the subfloor ahead of the finish crew's baseboard installation. After connection, the setup demands only basic calibration for optimal performance.
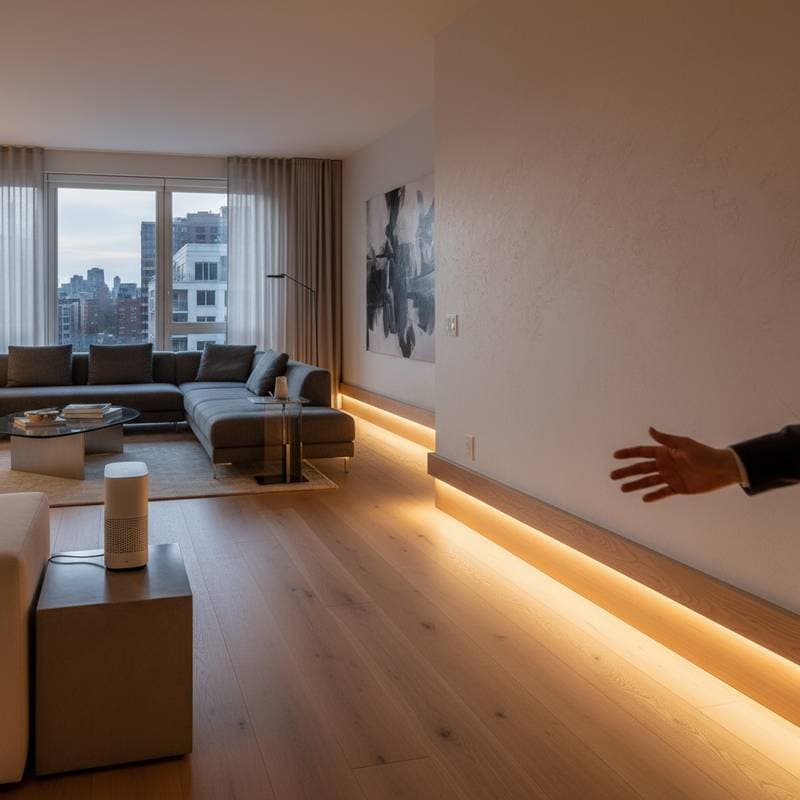
How Voice-LED Baseboards Function
These baseboards rely on essential components that woodworkers can integrate effectively. Grasping these elements builds assurance in project planning.
- LED Channel and Diffuser: An aluminum channel provides housing and dissipates heat. Recess it into a routed groove or secure it behind an additional molding profile. The diffuser lens ensures uniform light dispersion, eliminating harsh spots.
- Low-Voltage Wiring: Select stranded 18- or 20-gauge wire suitable for in-wall applications. Limit each circuit to under 30 feet (9 meters) to preserve consistent illumination levels.
- Power Supply and Driver: A 24-volt driver steps down standard electricity to low-voltage output. Position it in an accessible spot, like a closet or utility area.
- Smart Hub and Voice Control: Connect via Wi-Fi or Zigbee for integration. Users then adjust scenes, dimming, or color temperatures through voice commands.
- Trim Integration: Incorporate a detachable molding or magnetic entry for maintenance access, preventing any need to alter walls.
Precision in routing and alignment proves crucial. A minor height variance might lead to irregular lighting. Professionals often assemble extended sections on a workbench, verify the glow, and install them as complete units.
Practical Installation Guidance
Planning Phase
- Sketch circuit layouts in advance to prevent voltage drops.
- Site transformers close to available outlets for convenience.
- Evaluate LED color options and intensity prior to commitment.
- Allow a minimum 1-inch (25-millimeter) gap at carpet edges or flooring shifts.
Fabrication Steps
- Employ a straight router bit and edge guide on a firm surface to cut channels.
- Assemble and test the LED channel with diffuser before applying finishes.
- Drill openings for wire passage at corners and door frames.
- Mark each segment clearly to streamline connections on site.
Electrical Collaboration
Partner with certified electricians throughout. Though low-voltage setups pose low risk, verify polarity and select appropriately sized drivers. Opt for GFCI outlets near moisture-prone areas. Ensure dimmers align with LED specifications to eliminate buzzing or flickering.
Creative Design Options
Floating Baseboard Look: Recess the LED channel into wall paneling, creating a 0.5-inch (13-millimeter) reveal. This technique makes the wall seem suspended over a glowing strip.
Shadow-Line Profiles: Install a slim aluminum strip between floor and wall for clean minimalism. This suits concrete or tiled surfaces well.
Accent Wall Lighting: Limit LED runs to highlight walls, drawing attention to art or surface textures.
Stair and Step Enhancements: Embed strips along risers or beneath treads to boost safety and add rhythmic appeal.
All options adhere to the core approach: hide the electronics while showcasing the woodwork's artistry.
Budget and Scalability Considerations
Expenses depend on materials and project scope. Materials for a maple baseboard with embedded LED channel typically range from 15 to 20 dollars per linear foot (49 to 66 dollars per meter). Incorporating voice controls and hubs raises the full system cost to 25 to 35 dollars per foot (82 to 115 dollars per meter), covering wiring and supplies but excluding electrical labor.
The design adapts readily to different sizes. A compact hallway might require just one circuit and transformer. In larger residences, segment runs by area for targeted control in rooms, hallways, or stairs.
Essential Lessons for Success
- Integrate Wiring Early: Route paths before enclosing walls or laying floors.
- Select Matching Components: Align LED voltage, color spectrum, and dimming with the controller.
- Manage Heat Properly: Ensure ventilation around channels to prevent thermal issues.
- Design for Access: Incorporate clips or panels for hassle-free upkeep.
- Calibrate Light Levels: Aim for supportive glow rather than overpowering beams.
Ensuring Long-Term Performance
Regular checks keep the system reliable. Dust diffusers quarterly with a soft brush to maintain clarity. Inspect connections annually for secure fits. If brightness fades, swap LED strips via the clip-in design. These steps preserve the blend of craftsmanship and technology, sustaining the installation's appeal and functionality for years.